The Ultimate Guide to Creating Stunning Travelogues: PC & Mobile App Tutorial for Mafengwo
Meta Description: Master the art of travelogue creation with this complete PC & mobile app tutorial. Learn to add music, videos, images, and more on Mafengwo. Turn your trip memories into captivating stories that rank high in search.
Introduction: Why Your Travel Memories Deserve to Be Shared
You've just returned from an unforgettable journey. Your mind is overflowing with scenic vistas, mouthwatering local cuisine, and serendipitous encounters—but where do you even begin to write? Every trip is a unique story waiting to be told. When you stood on that unfamiliar street, felt a foreign breeze, or shared a smile with a stranger, those moments deserve to be preserved.
A well-crafted travelogue isn't just a personal diary; it's a guide for fellow travelers and a legacy of your adventures. On platforms like Mafengwo, the travelogue editor-in-chief receives countless questions daily: "How do I add background music?" "What's the maximum video size?" "Are there cover image requirements?" This comprehensive travelogue creation guide answers all those questions and more, transforming you from a hesitant beginner into a confident pro.
Whether you prefer the precision of a computer or the spontaneity of a mobile app, this step-by-step travelogue tutorial covers every technique you need. Let's turn those sparkling travel memories into immersive stories that transport your readers.
PC Creation: The Ultimate Big-Screen Travelogue Experience
If you enjoy meticulously polishing your words on a large screen with a full keyboard, the Mafengwo PC travelogue editor is your best friend. Multi-window operation, drag-and-drop functionality, and precise formatting make desktop creation effortless.
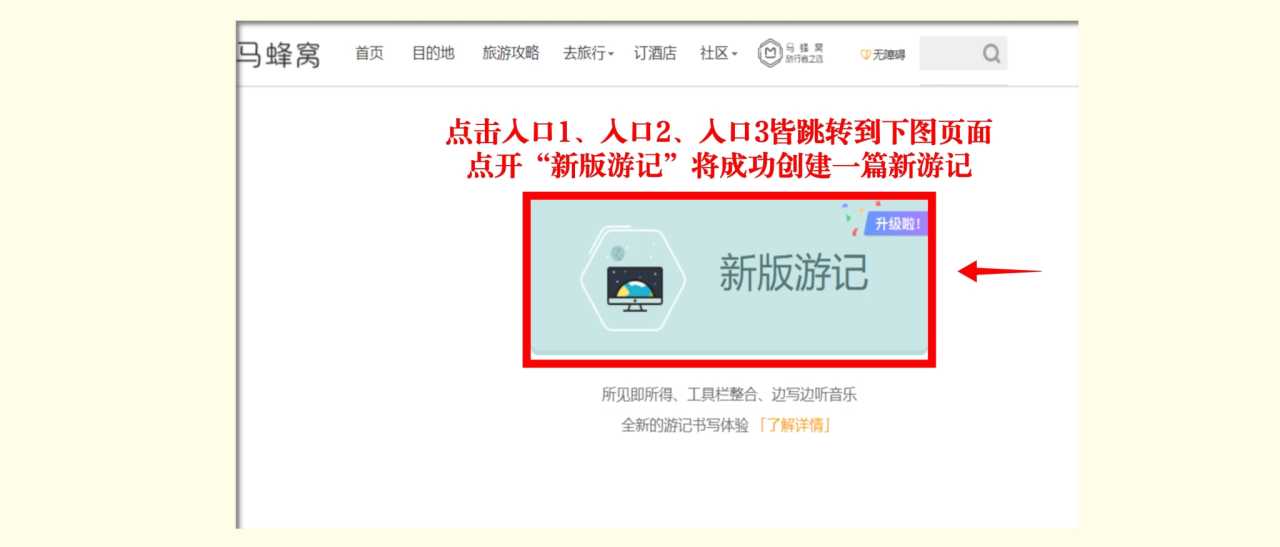
Finding the "Write a Travelogue" Button
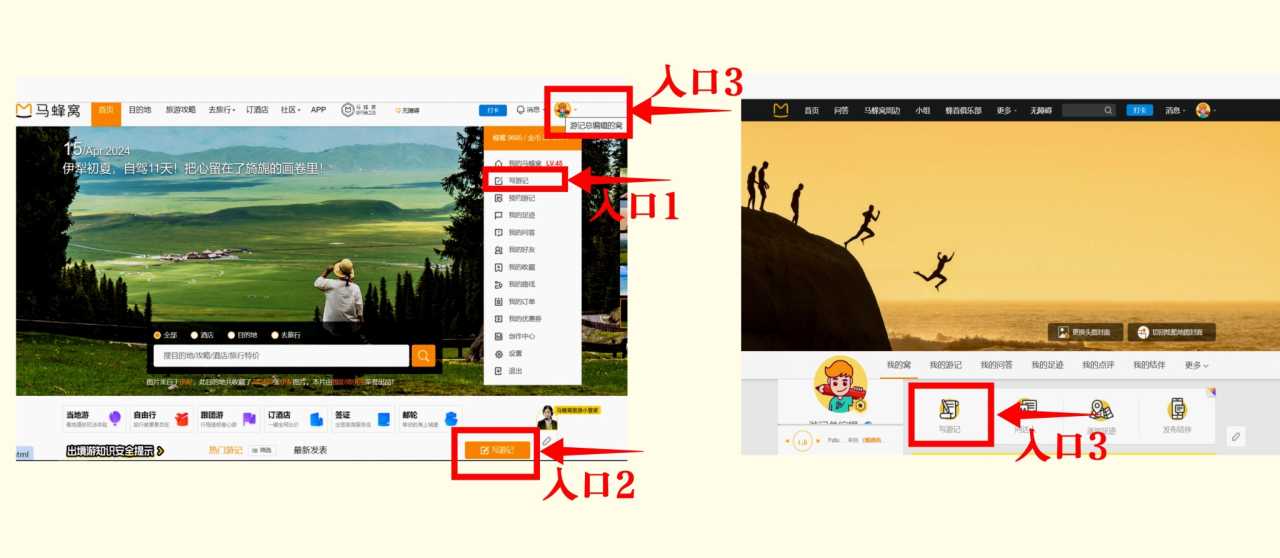
On the Mafengwo homepage, three hidden portals lead to the creation dashboard:
- Top-right "My Nest" menu: Hover your mouse, then click "Write a Travelogue" from the dropdown.
- Homepage popular travelogues section: The eye-catching "Write a Travelogue" button—one click and you're in.
- Personal profile page: Navigate to "My Nest" and locate the option on your profile.
Whichever entrance you choose, you're about to embark on a creative journey.
Body Editing: Let Your Travel Words Flow
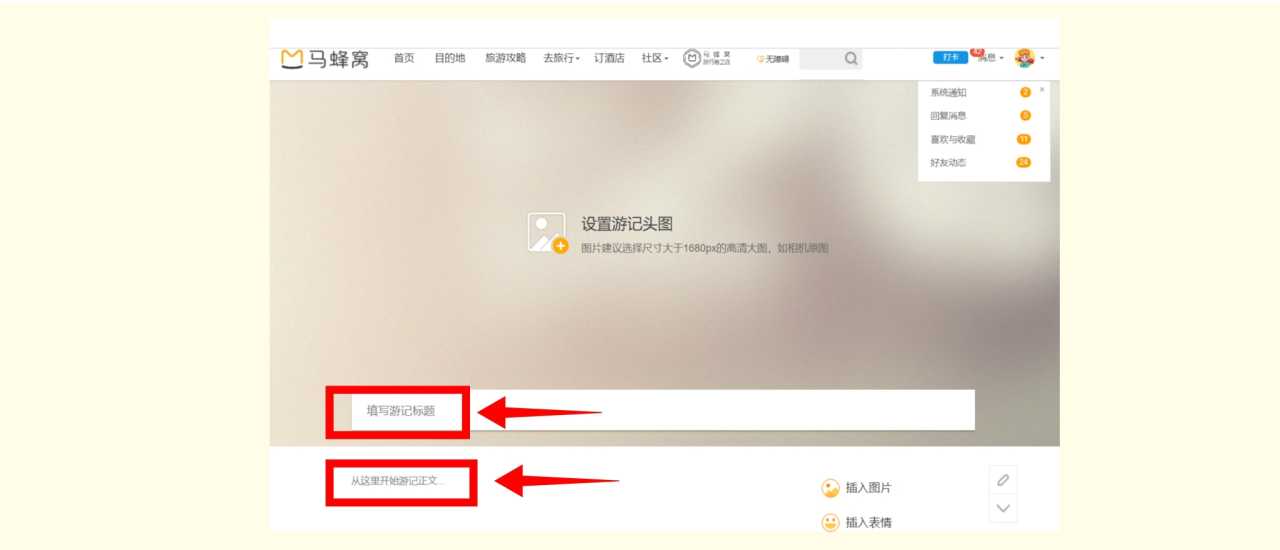
After creating a new travelogue, the title bar appears first. Remember: your title is the face of your travelogue. Keep it under 48 characters—captivating yet precise. The body editor is a blank canvas where you can paint every detail of your journey.
Pro tip: Write your destination name naturally in the first paragraph. For example, "As I wandered through the streets of Kyoto..." This signals relevance to search engines and readers alike.
Cover Image Design: Grab Attention at First Glance
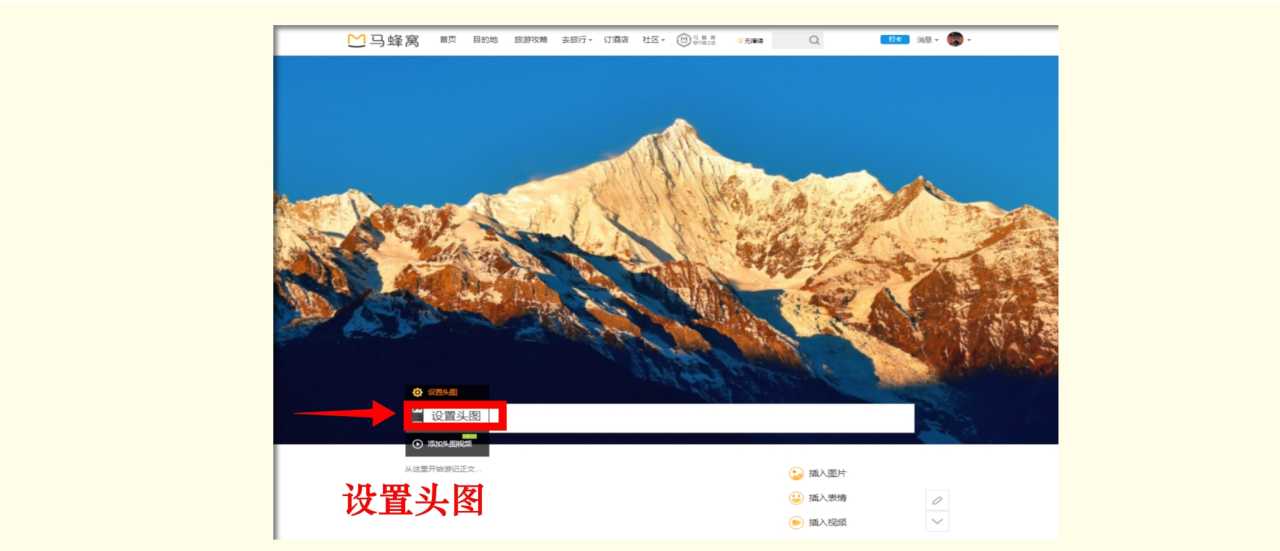
A stunning cover image makes your travelogue stand out among thousands. Recommended dimensions: larger than 1680px width, minimum 1350px width and 480px height. Imagine readers scrolling—your cover acts like a window, instantly transporting them into your world.
[Link: How to choose the perfect travelogue cover photo]
Creating a Table of Contents: Keep Your Story Organized
Click "Insert Section Title" in the right-side feature list, enter the chapter name, and confirm. The table of contents automatically appears in the lower-right "Travelogue Directory." For a personalized touch, choose "Custom Section Style" and upload your own design. This allows readers to flip through your story like a book, quickly finding sections that interest them.
Inserting Images: Let Pictures Speak Volumes
Images are the soul of any travelogue. Click "Insert Image," then select "Upload Local Image." Recommended size: larger than 100x50 pixels, each image under 30MB. Hold the Ctrl key to select multiple images—up to 100 at a time. Even better, scan a QR code to upload directly from your phone, saving you cable hassles.
After uploading, click "Add Shooting Location," enter the place name, and a green marker appears. Drag the image to the corresponding location. The shooting location appears at the bottom left of the image, helping readers follow your route.
Inserting Videos: Bring Motion to Your Travelogue
Videos make your travelogue "come alive." Click "Insert Video" and upload a file under 1GB. After transcoding, preview the playback. Don't forget to add a shooting location and a description (under 50 characters) to help viewers understand your perspective.
Inserting Music: Set the Mood
Music is an emotional catalyst. Click "Insert Music," browse, and upload a local music file. When readers open your travelogue, the background music softly plays, instantly creating a travel atmosphere.
Inserting Emojis: Add Personality
Emojis are the seasoning for your text. Click "Insert Emoji," choose travel-related icons like "plane" or "sun," and the corresponding code appears in the text. For example, entering "plane" transforms into a small airplane icon, making your writing lively and fun.
Saving and Restoring: Create Without Limits
- Save Draft: Click "Save Draft" on the right to store unfinished work. To continue later, click "Write a Travelogue" at any entrance and go to "My Drafts."
- Preview and Publish: Click "Preview" to see how text and images look together. Satisfied? Click "Publish," link your travelogue to a destination, and submit for review.
Mobile App Creation: Record Inspiration Anywhere
With your phone in hand, inspiration never runs out. The Mafengwo mobile app is designed for lightweight, on-the-go creation during your travels.
Quick Start: Open the App
Tap the yellow "+" button at the bottom, select "Write a Travelogue," and you're instantly on the publishing page. From title to cover, everything is at your fingertips.
Body Editing: Simple and Efficient
After entering the title, tap "Add Cover" and choose a photo or video from your local files. Remember: the cover is the face of your travelogue—pick a photo that best represents your journey.
Creating an Itinerary: Make Your Route Clear
Tap "Itinerary" in the bottom feature list to enter the itinerary editor. Add specific routes for each day, including cities, attractions, hotels, and restaurants. Once done, tap "Itinerary Preview" to see a complete overview, making it easy for readers to follow in your footsteps.
Creating a Table of Contents: Organized Navigation
Tap "Section Title," enter the chapter name, and confirm. The table of contents automatically appears at the bottom of the page. Readers can tap any section to jump directly to that part.
Inserting Images: Flexible Layout
Tap "Images" to upload local photos. For advanced features, use Multi-Image Layout: long-press to select an image, drag it to the desired position, and combine two or three images into a single layout. This saves space and makes your display more efficient and visually appealing.
Inserting Videos: Dynamic Recording
Tap "Video" to select a local video for upload. After transcoding, add a location and description to help viewers understand your intent.
Inserting Emojis: Add a Touch of Fun
Tap "Emoji," choose from the "Xiao Ma Xiao Feng" or "Classic" series, and swipe left or right to see more icons. The right emoji can instantly bring your text to life.
Inserting Music: Create Atmosphere
Tap "Music" and choose a song from the platform's licensed music library. Note: you can only add music authorized by the platform.
Saving and Publishing: One-Tap Done
- Save Draft: If your travelogue is unfinished, tap "Save Draft" at the bottom to edit later.
- Access Drafts: Go to "My Profile," tap "Travelogues - + Travelogue," enter the draft box, and select "Draft Pending Completion" to continue.
- Publish: After tapping "Publish," complete the "Travelogue Editor" information, scroll to the bottom to find tags, and link relevant topic tags to help more people discover your work.
FAQ: Common Travelogue Creation Questions Answered
1. Can I withdraw a travelogue after publishing?
Unfortunately, once published on PC or mobile, a travelogue cannot be withdrawn. Always preview thoroughly before hitting publish. If you need to make minor corrections, you can edit the published travelogue from your profile.
2. What are the exact image size requirements for the cover?
For best results, use an image larger than 1680px wide. Minimum acceptable dimensions are 1350px width and 480px height. Larger images ensure crisp display on all devices.
3. How many images can I upload at once on PC?
You can select up to 100 images at a time by holding the Ctrl key during selection. Each image must be under 30MB and larger than 100x50 pixels.
4. Why can't I add custom music on the mobile app?
The mobile app only supports music from the platform's licensed music library to ensure copyright compliance. For custom music uploads, use the PC version.
5. Can I add shooting locations to all my images?
Yes! After uploading any image, click "Add Shooting Location," enter the place name, and drag the marker to the correct position. This feature is available on both PC and mobile.
Tips for SEO-Optimized Travelogues
To help your travelogue rank higher in search results and reach more readers:
- Use location-specific keywords naturally in your title and headings (e.g., "Kyoto Cherry Blossom Travelogue: A Complete Guide")
- Include destination names in the first 100 words
- Write descriptive alt text for your images (e.g., "Golden Temple Kyoto autumn foliage")
- Link to related content on your profile or other travelogues
- Use bullet points and short paragraphs for easy reading
- Add relevant tags before publishing
[Link: Top 10 travelogue SEO mistakes to avoid]
Conclusion: Start Your Travelogue Journey Today
Your travel memories are too precious to remain locked in your phone or camera. With this complete PC & mobile app tutorial, you now have all the tools to create stunning travelogues on Mafengwo. Whether you're a meticulous desktop writer or a spontaneous mobile creator, the platform offers everything you need—from music and videos to interactive maps and emojis.
Ready to share your next adventure? Open Mafengwo, click that "Write a Travelogue" button, and let your story inspire the world. Every journey deserves to be told—and now you know exactly how to tell yours.
What travelogue will you create first? Start drafting today, and don't forget to tag your destination for maximum visibility. Happy travels and happy writing!
You should also read:
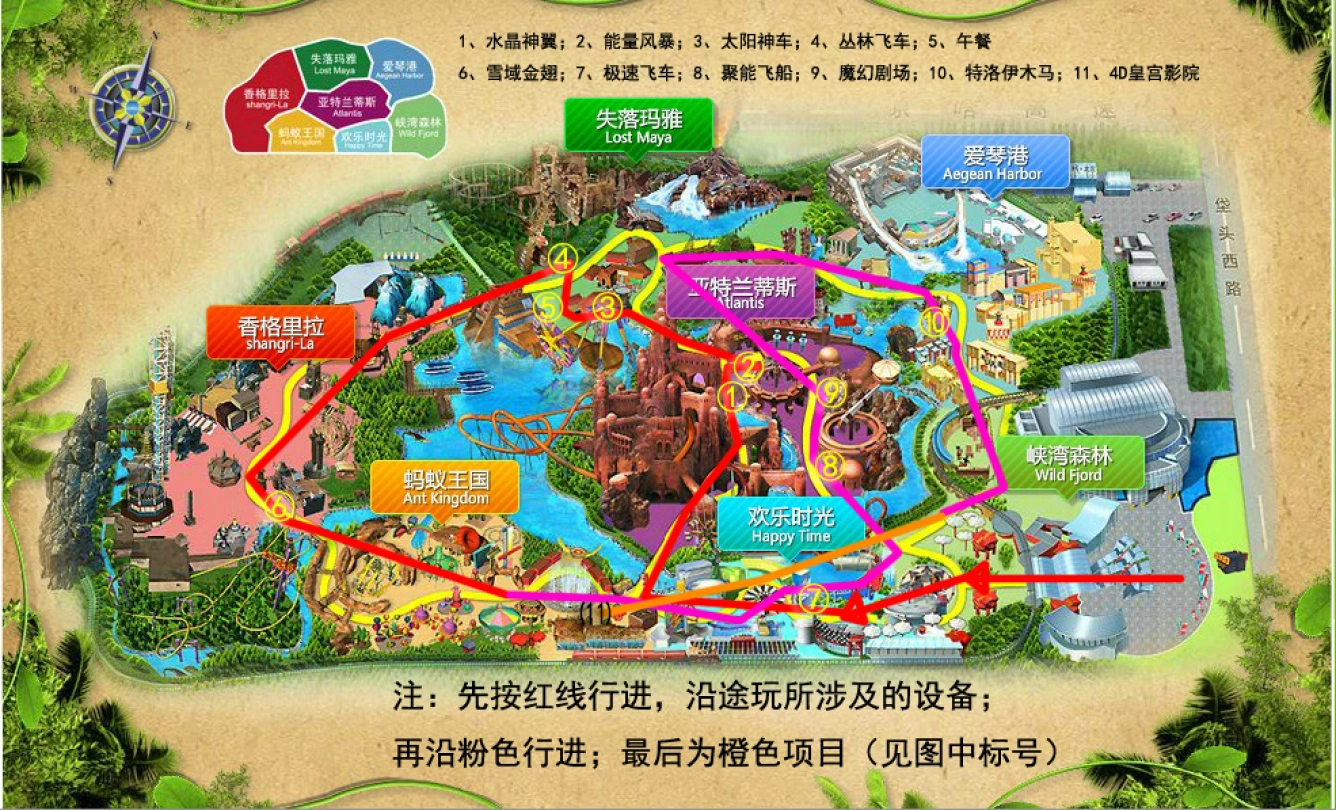
Beijing Happy Valley Ultimate Money-Saving Guide: Ride Everything, See Every Show in One Day
Here is the SEO-optimized, rewritten article based on the source material. It is structured for readability, keyword density, and user engagement, targeting approximately 1500 words. SEO Title: Beijing Happy Valley Ultimate Money-Saving Guide: Ride Everything & See Every Show in One Day Meta Description: Maximize…
Continue reading...
Peking: A Seven-Day Journey Between Old Dreams and New Realities – An SEO-Optimized Travel Guide
Meta Description: Explore Beijing in 7 days: from 798 Art District and Summer Palace to Houhai nightlife and Panjiayuan market. Discover hidden gems, local eats, and travel tips in this SEO-optimized itinerary. Some cities you never set foot in, yet you have painted them in…
Continue reading...
Four Seasons in Beijing: A Complete Guide to Experiencing the Capital's Year-Round Beauty
Meta Description: Discover Beijing through all four seasons in this comprehensive guide. From late summer ginkgo leaves to winter snow at the Forbidden City, explore the capital's hidden gems, cultural festivals, and timeless charm. On the first day of August, I boarded a northbound train…
Continue reading...